

Prepare Your Art
All files must be at least 300 ppi or Vector Format for screen printing. If your file is not 300 ppi, you cannot just increase the resolution of the file. This is called "upsampling" and will result in a blurry image. If you are creating your file in Adobe Illustrator or another Vector-based software, just size your image to the size you want it to print.


Please Note: 3 or more color changes is no longer considered the same design!
Half Tones: Please allow us to halftone the images for you. If we do not control the halftones, we cannot guarantee the quality of the print. We do understand that some designs are complex and will require separation fees, as a client you may be inclined to try to separate or halftone the image yourself to try to keep your cost as low as possible. Unfortunately this does not work. Our computers in the art department are calibrated to set the halftones specifically for the films and screens that we use for printing. Often times if you try to separate or halftone the image yourself it may cause more art charges than you would have originally incurred.
Accepted File Types
We accept the following File Types for Screen Printing:
- Illustrator (.AI)
- Vector (.EPS)
- Photoshop (.PSD)
- JPEG
- TIFF
We prefer .AI or .EPS files first because Vector images can be scaled without affecting quality. We prefer .PSD or .PDF second & .JPG or .TIFF last. Check out our blog 'How to Prep & Quality Check Your Artwork' to learn more about file prep!
Size Your Design
Your screen print logo or design should be sized to the size it should be printed. If you want your print to be 10" wide, please be sure the actual design within the file is 10" wide, not just the background of your design file. Go to the T-Shirt Templates Page, download the appropriate template and place your design on the template to the size you would like it to appear on the shirt.
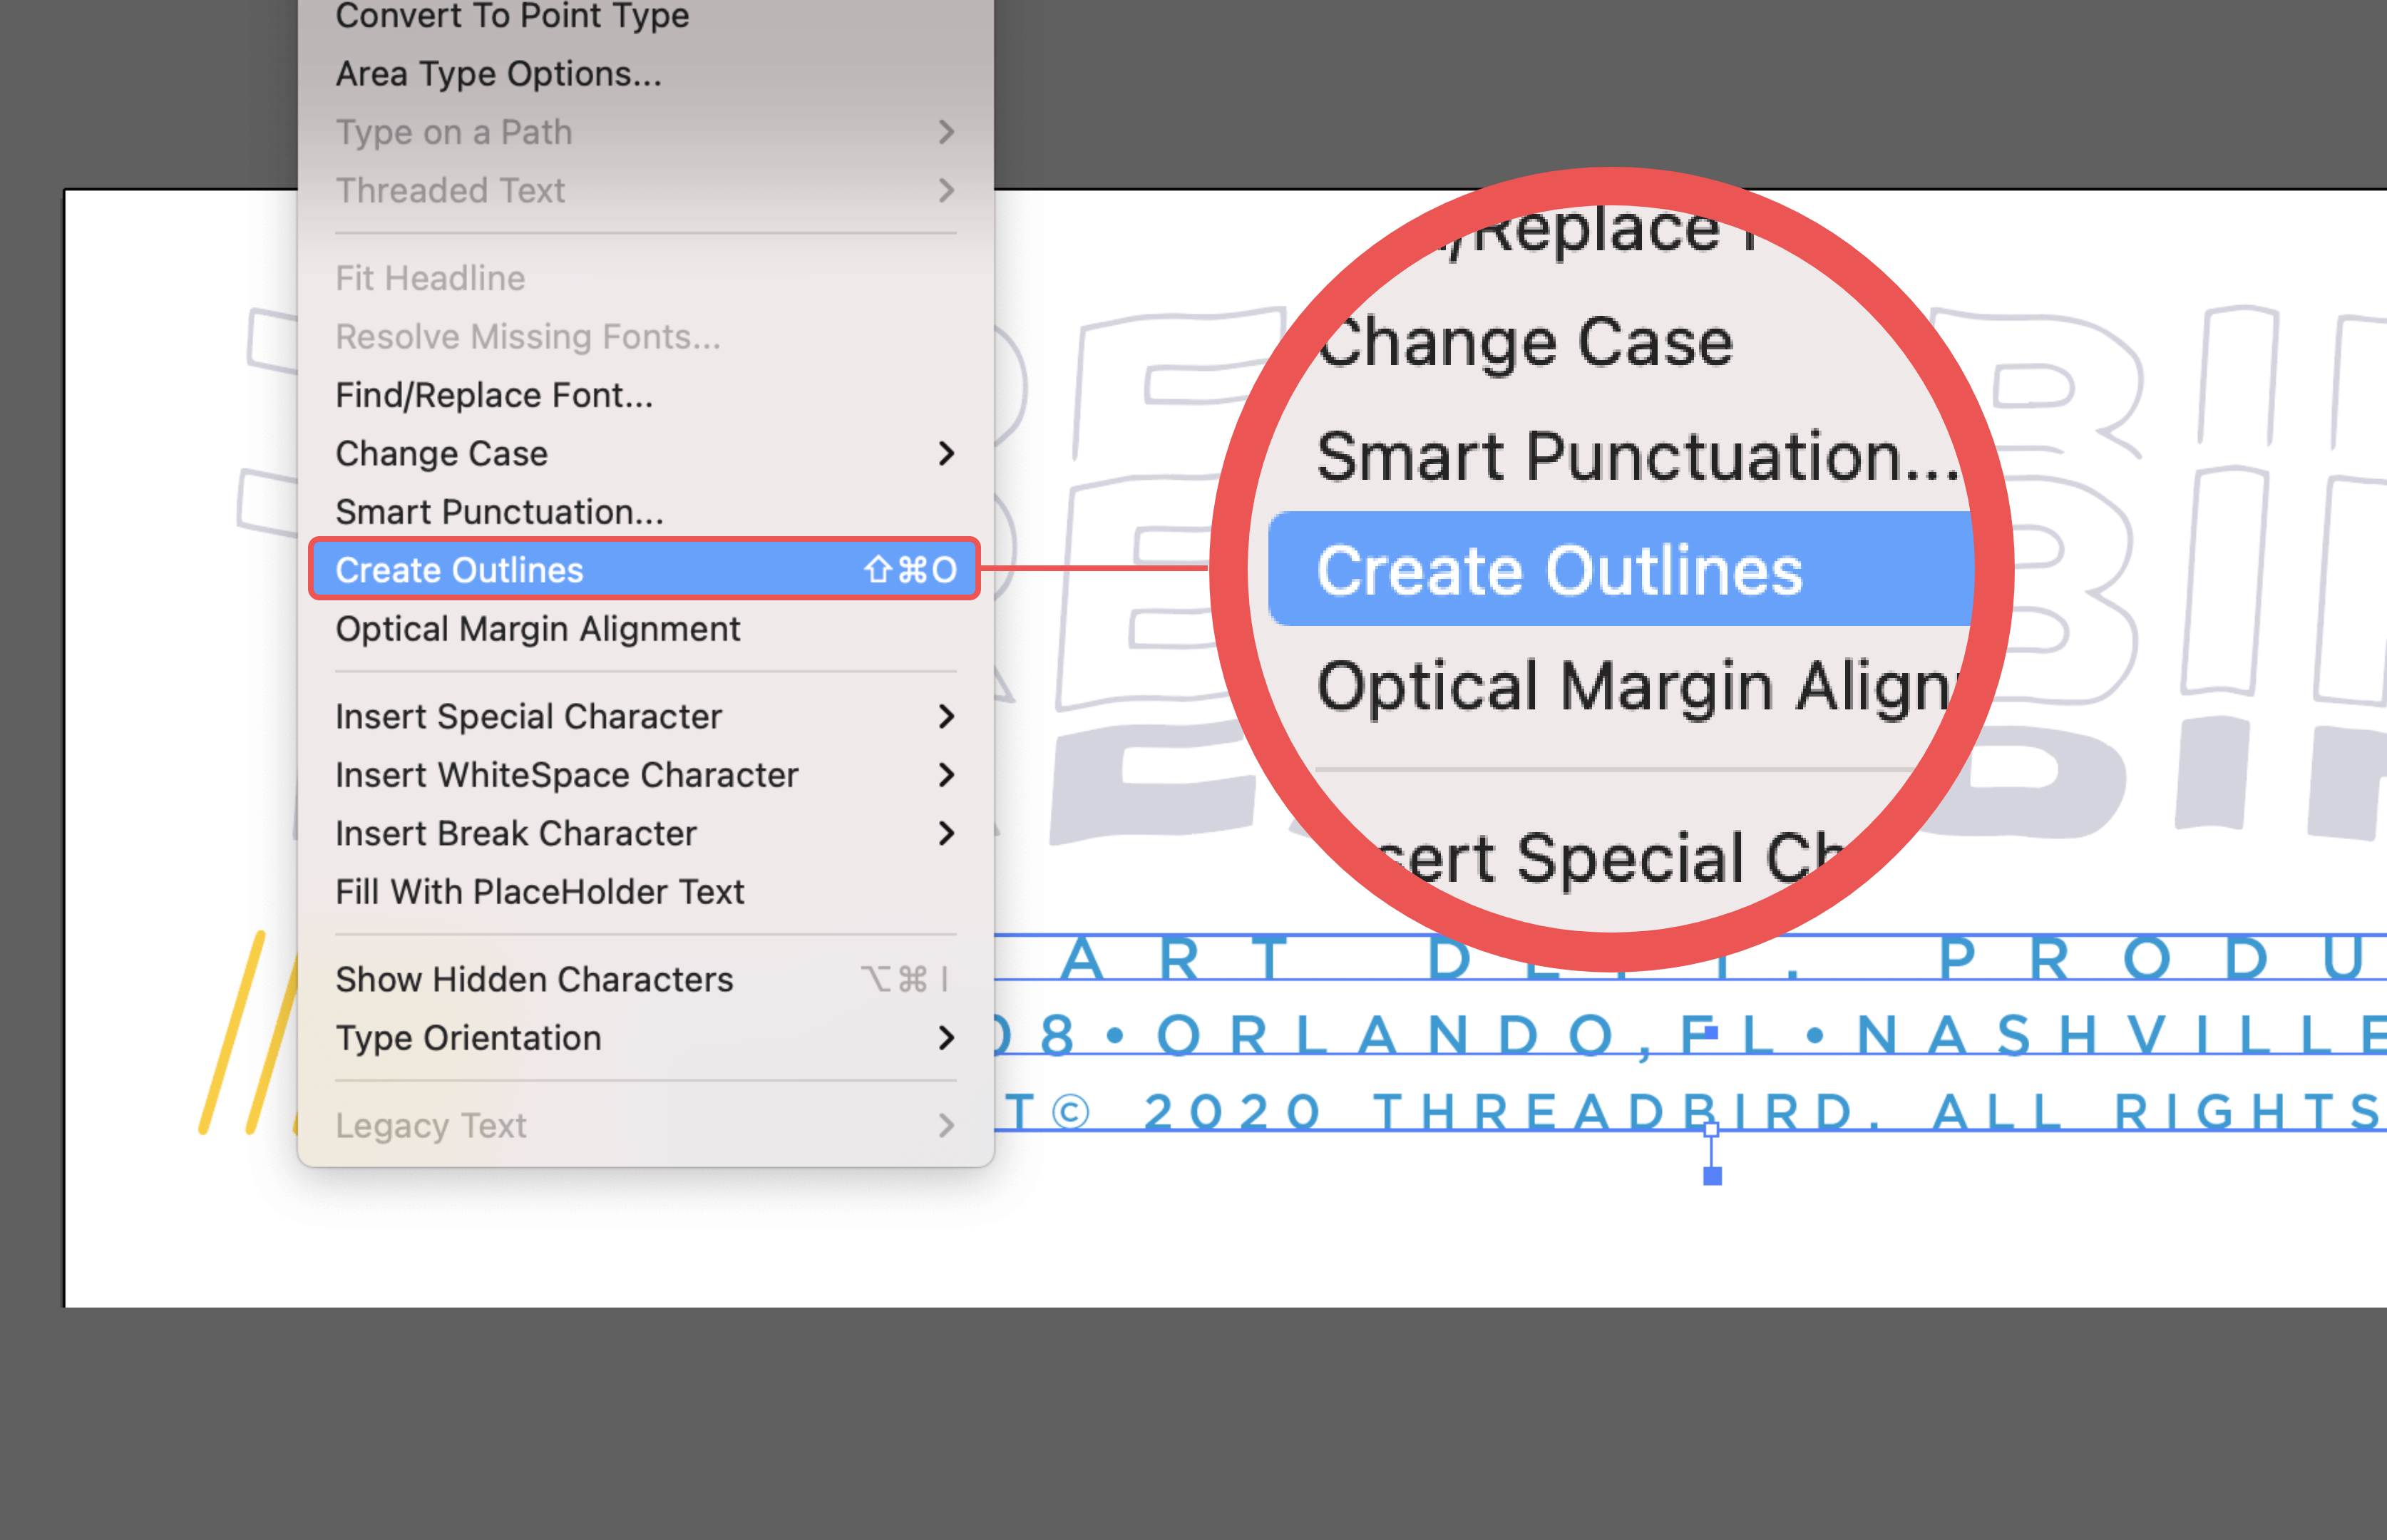
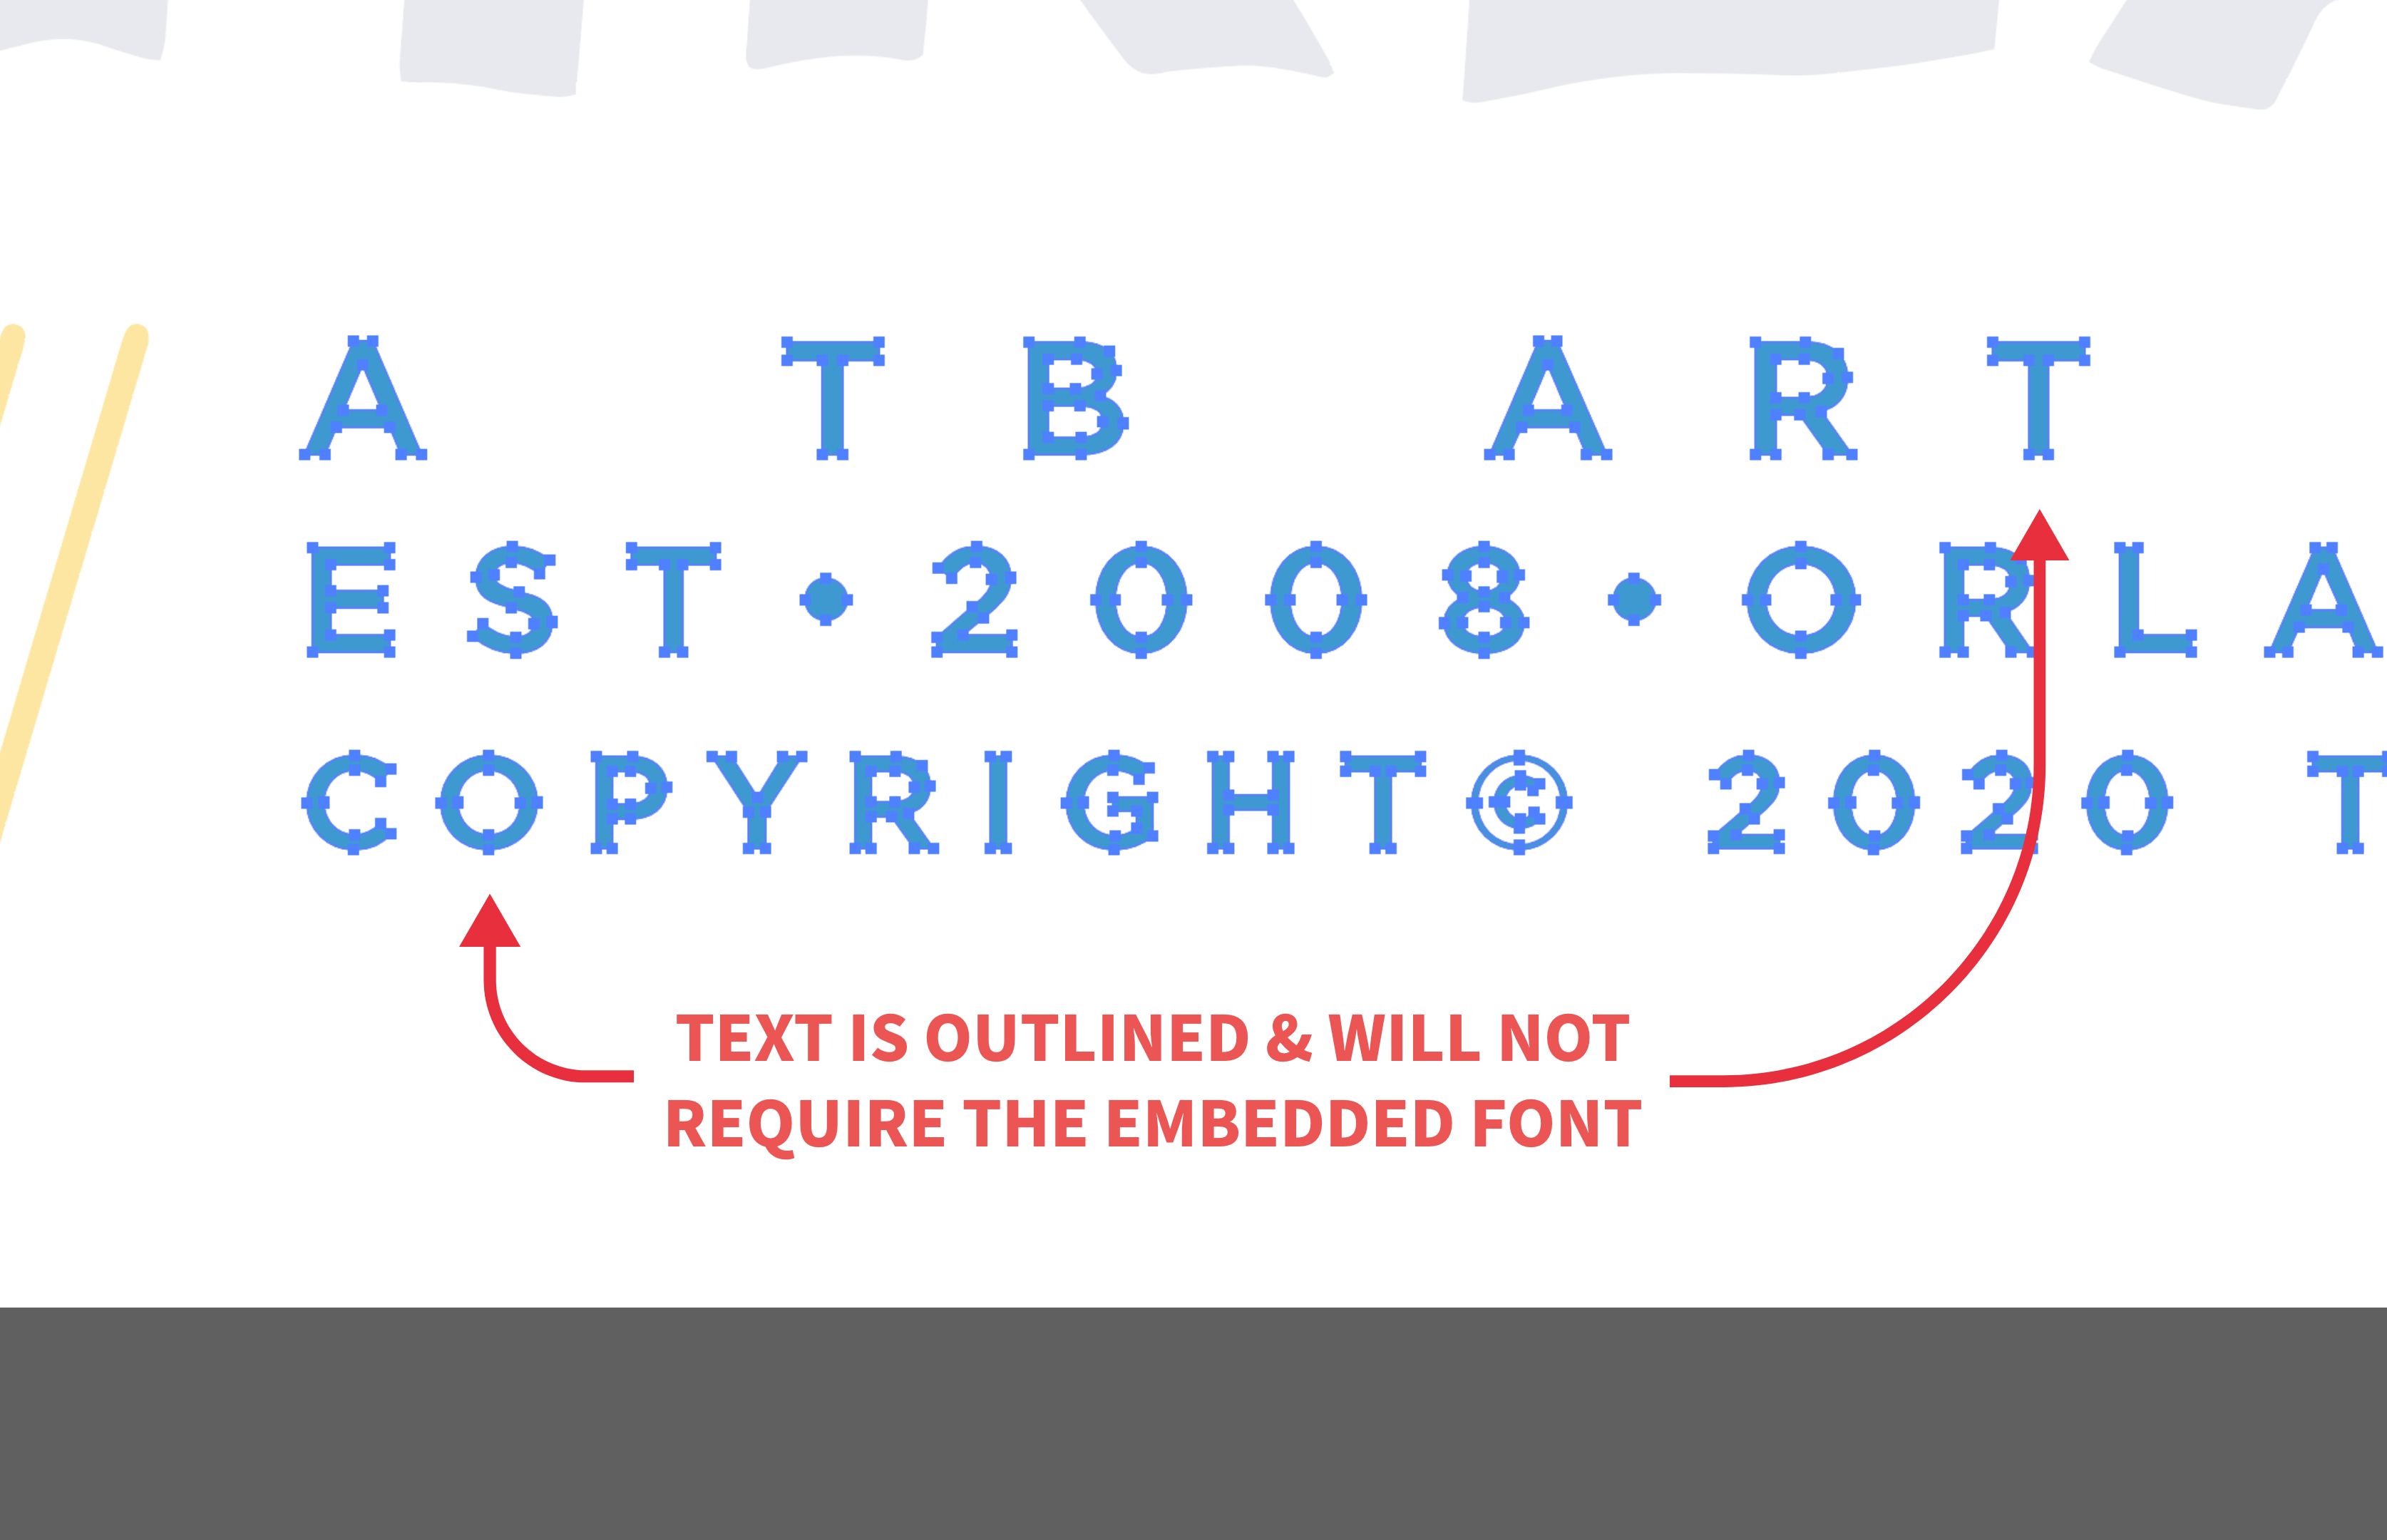
Convert Your Text to Outlines
If you are creating your file in Adobe Illustrator, you will need to choose "Create Outlines" on all your text. This allows us to open the file without requiring the font.
Use Our Templates
Use one of Threadbird's screen print design templates to submit your final design. Go to the Templates Page. (For Apparel Printing Threadbird Templates are not required but recommended.)
Working with Canva Templates
If you don’t have the Adobe programs or you’re looking for some templates to inspire you, Canva can be a helpful place to start. In order to get the best outcome for your print-ready designs, it's super important to know how to set up your Canva template properly.
One beneficial feature of the platform is the built-in design and printing service (for Direct to Garment Printing only) called Smartmockups. Once you have created your design, this tool allows you to visualize how your design will look on a t-shirt. You may need to resize your design to fit the shirt. **It's important to note, some capabilities within Canva require users to have the paid version of Canva. These include:
- Resizing the artboard with your designs. The artboards in Canva are auto set to 14” x 18”.
- Exporting PNG files with a transparent background.
When you're ready to export your designs, hit the ‘Share’ button > Downloads > PDF Print. Doing this will export the file with the necessary DPI resolution of 300 required for printing. For text based designs, we also recommend saving them as a PDF file.
Threadbird Screen Sizes
- Standard Screens - 14" x 17"
- Jumbo Screens - 18" x 23"

Printed/Sewn In Tag Information
It is required by the US Government that the following information be included in all garments:
- Size
- % of Material
- Country of Origin (for the garment, not your brand)
- Care Instructions
Please feel free to use one of our custom tag templates to help create your tag files: Download Tag Template here.
These are non-negotiable. We cannot list "Printed in the US" or "Processed in the US" instead of listing what country the shirt is manufactured in, it *must* have the country information on the garment. If you are unaware of the information needed for the shirts you are ordering, please leave your tag files editable and add place holders for the information. When you submit your artwork, please submit the editable tag file (PSD or AI) as well as the fonts used to create the tag. The fonts are very important as we cannot edit fonts we don't have.
To find out more about these rules, please visit this resource called: Threading Your Way Through the Labeling Requirements Under the Textile and Wool Acts
Picking PMS Colors
We will provide free pantone color matching for your garments when your orders are submitted. However, there is an issue with pantone matching, and that is that not every color looks the same on every monitor. A certain red on your screen may appear to be a different red on ours. There is no universal color calibration for computers. It is always best to try to supply your own pantone colors if possible. The best way to do this, and the most accurate way, is to purchase a Pantone Plus Series Solid Coated Formula Guide. This can be purchased as part of the set (Coated and Uncoated) through Amazon. The reason why it's best to buy the book, once again, is the pantone guide on your version of photoshop is still using your color calibration, and will not necessarily be accurate.
Max Imprints
Please note that not all shirts will be sewn exactly the same; these dimensions are to be used for reference as a "safe" zone to avoid printing on any seams or edges. Be sure to check the specific product page for "Size Specs" specific to that garment. NOTE: Any print that goes over a seam can result in imperfections in the print. (Which can be very cool-looking, if you're into that.)
Unisex/Mens
- X-Small - 12" x 20"
- Small - 13" x 22"
- Medium - 15" x 23"
- Large - 17" x 24"
Womens/Juniors
- Small - 11" x 18"
- Medium - 12" x 19"
- Large - 12" x 20"
- X-Large - 12" x 21"
Youth
- Small - 13" x 13"
- Medium - 13" x 16"
- Large - 14" x 19"